The tab interface includes a table with a timeline, a list of offices, staff shifts, and scheduled patient appointments. You can view the schedule for previous and upcoming days by selecting the desired date in the header. Additionally, you can set a filter to display specific offices.
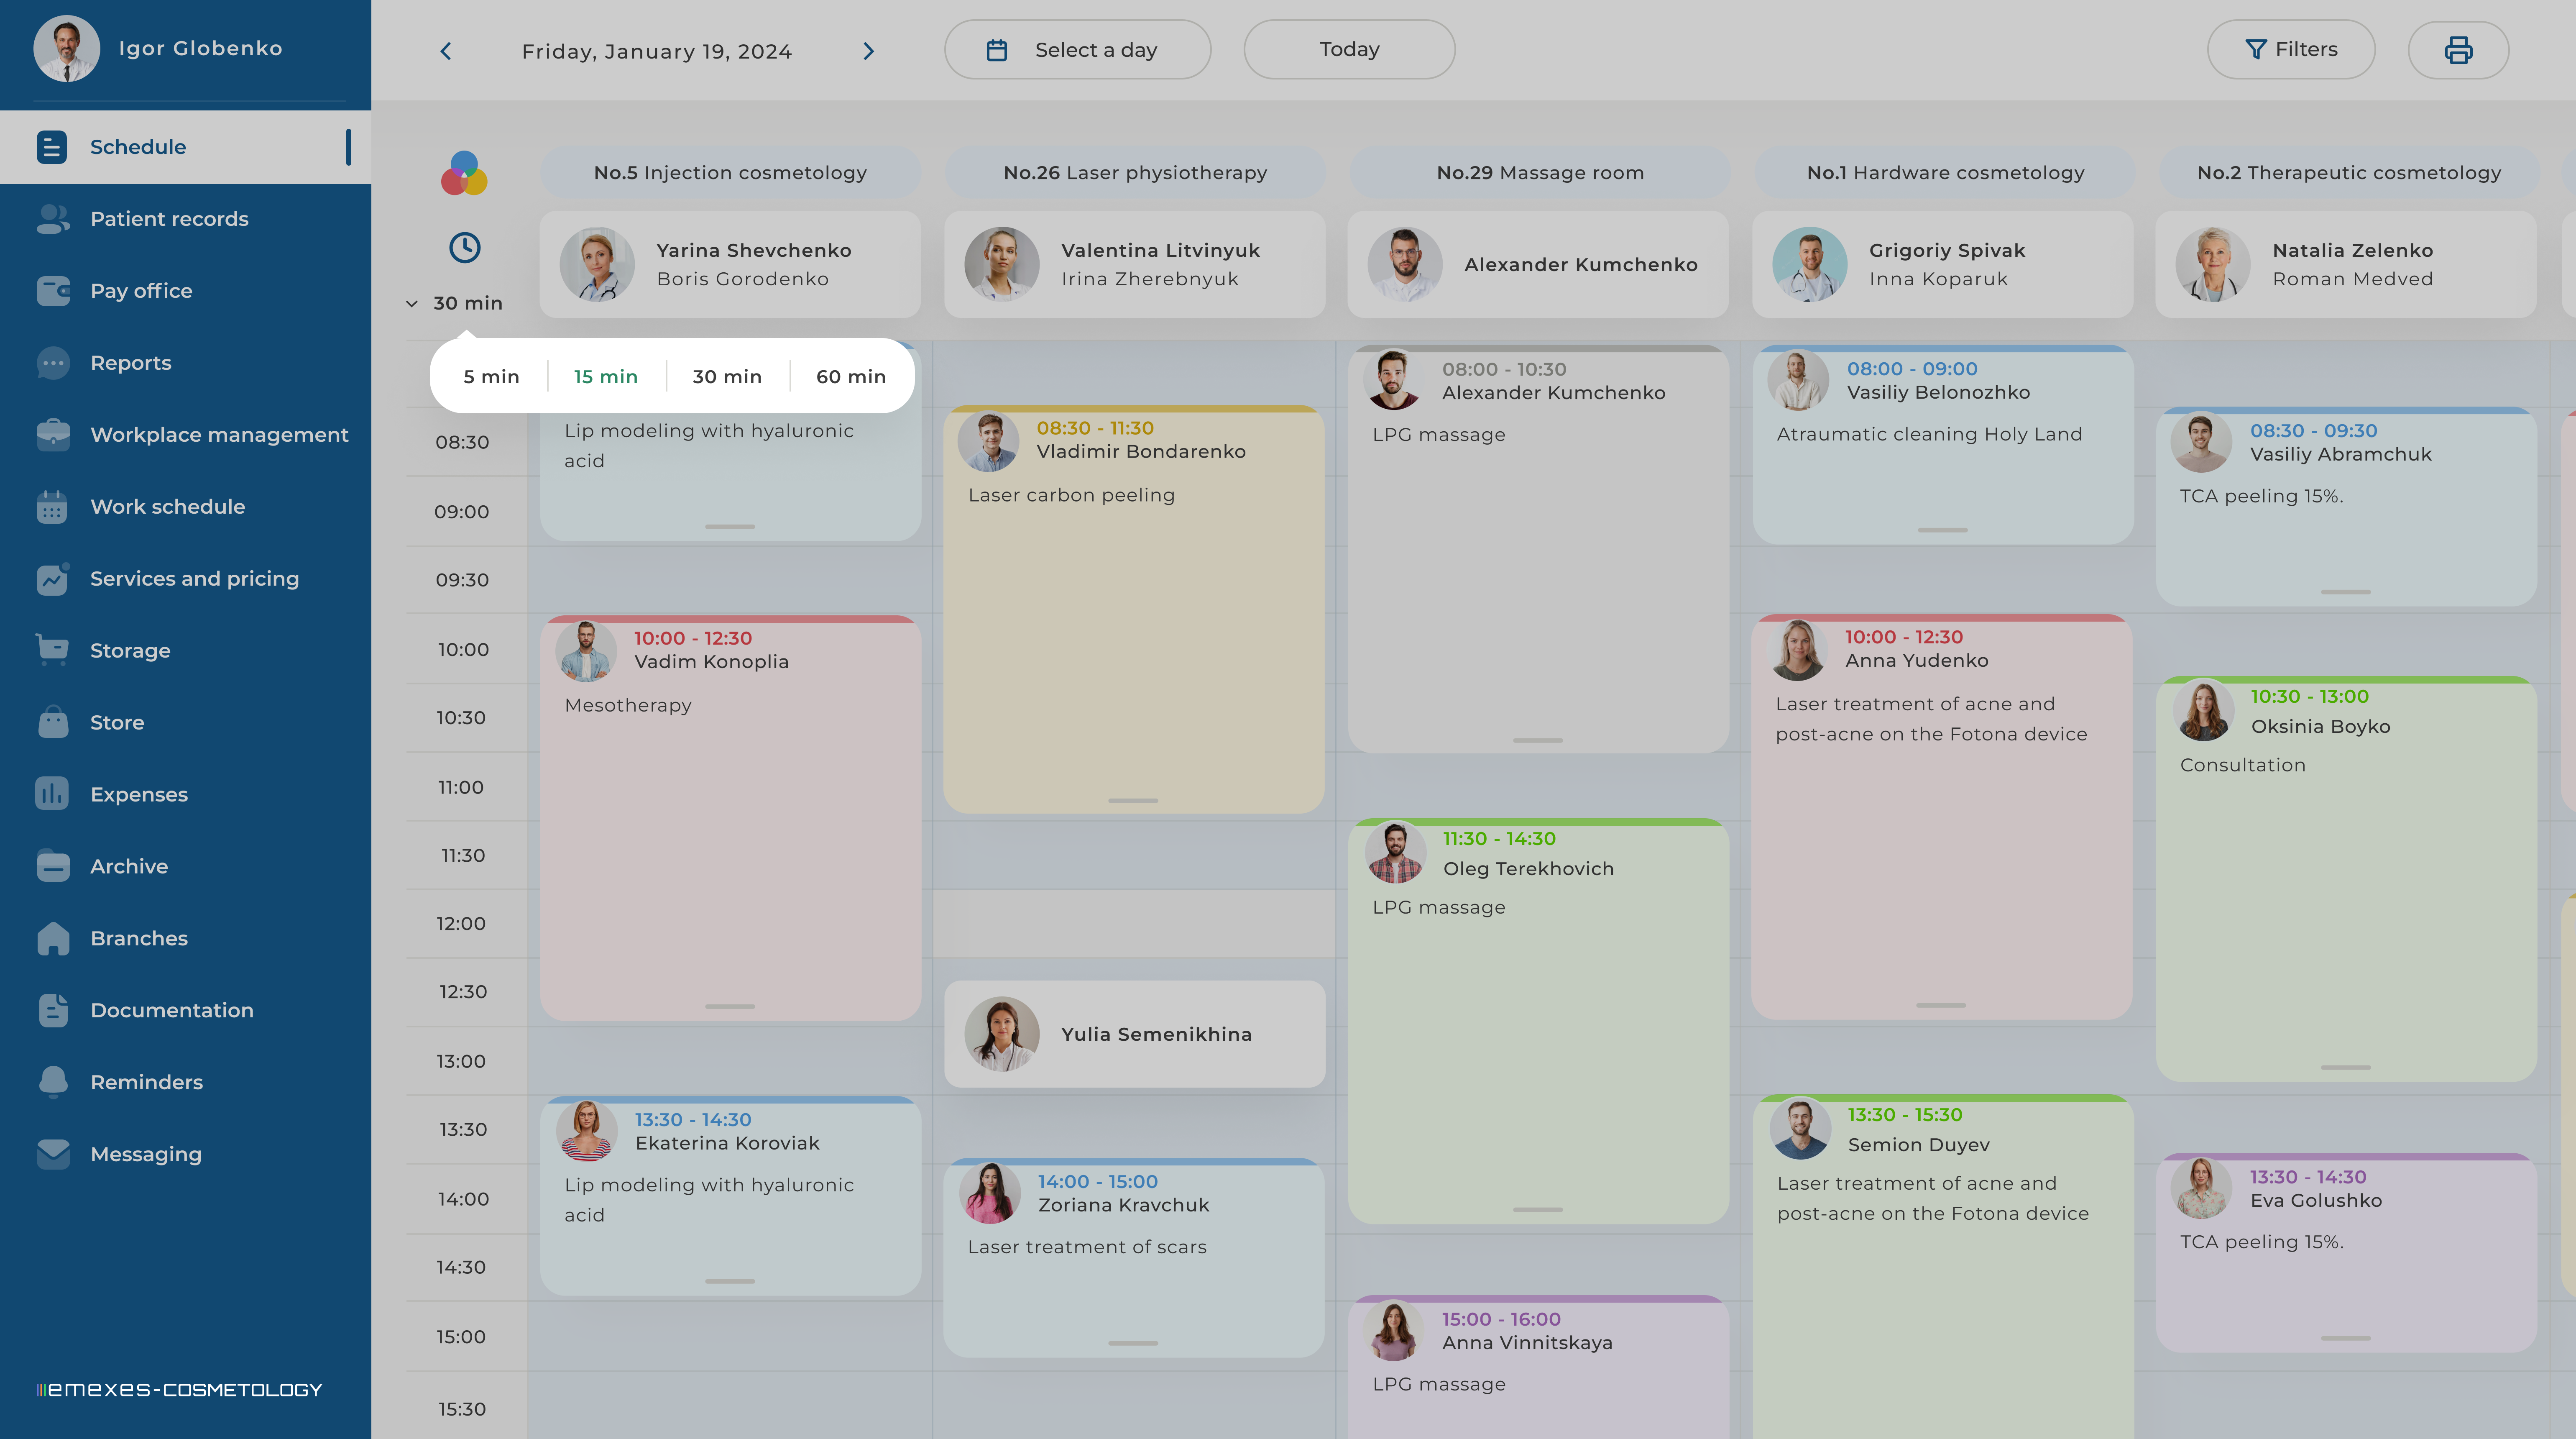
1. TIMELINE
The timescale is set to 24 hours, and the division value of the timescale can be adjusted in the upper left corner of the table, ranging from 5 to 60 minutes.
When you enter the Schedule tab, a horizontal dotted line indicates the current time, allowing you to view the table in the context of the current time frame at all times. To return to the current time, simply click on the clock icon in the upper left corner.
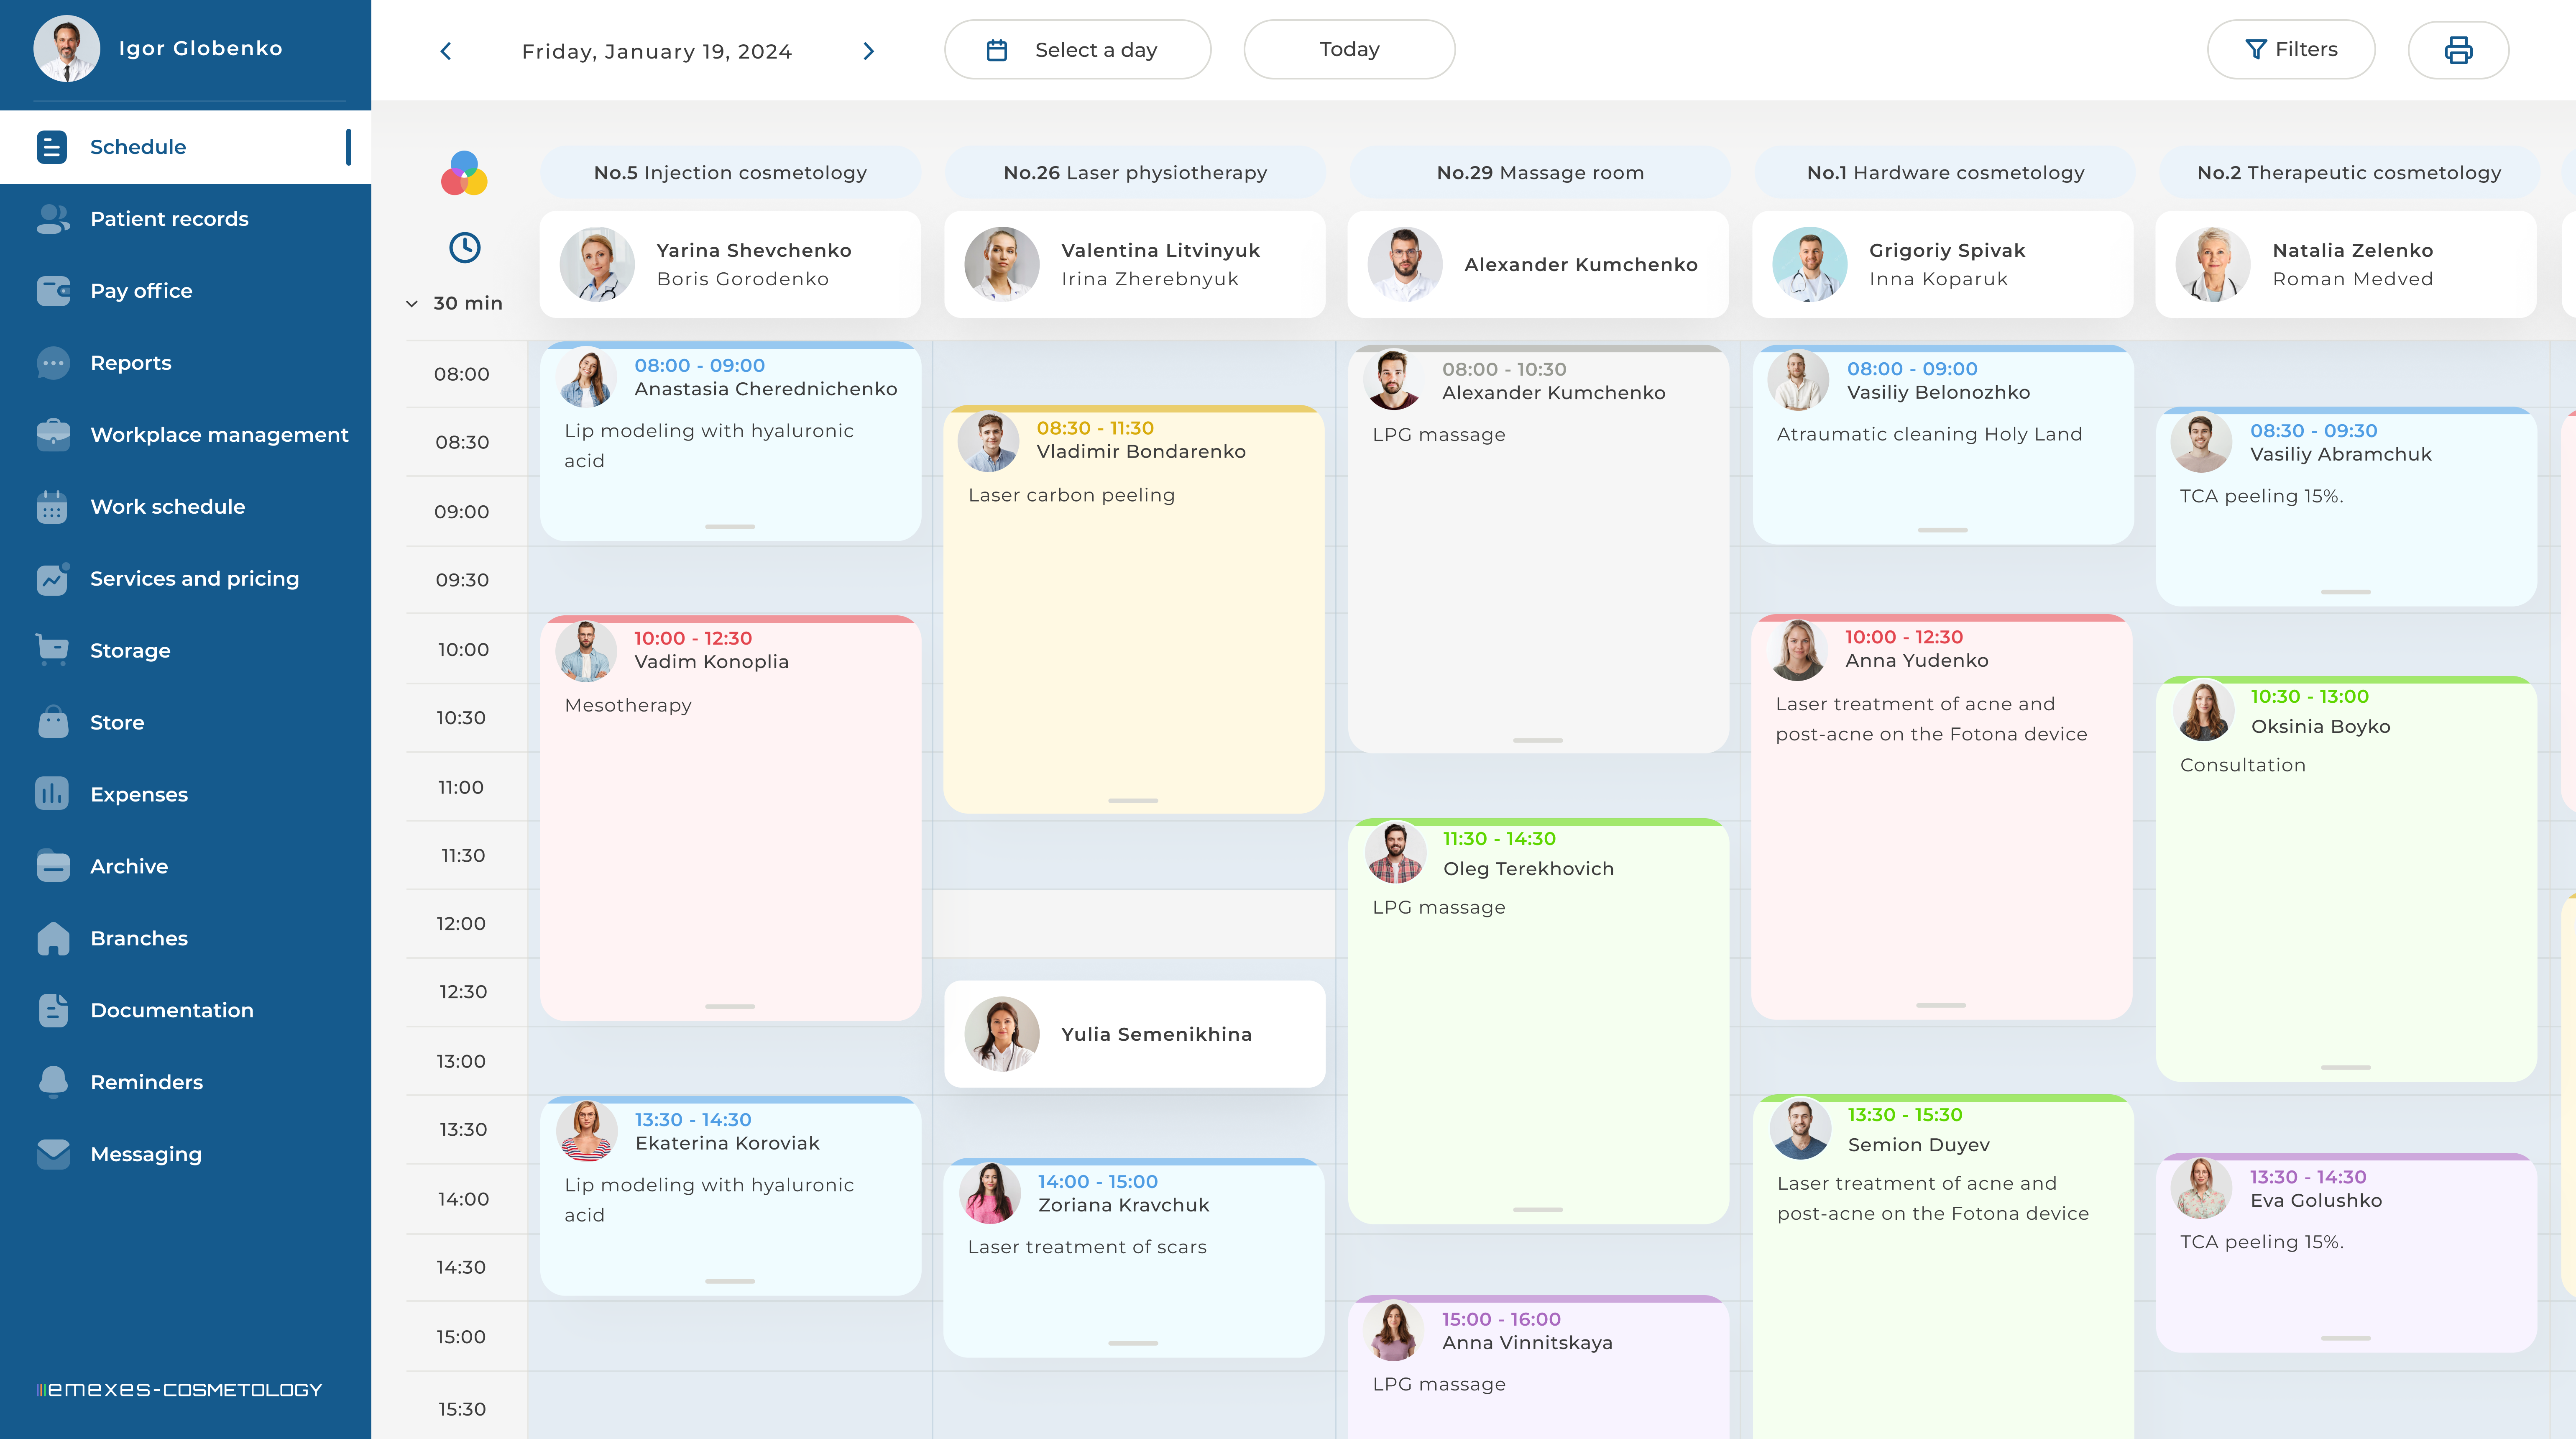
2. OFFICES
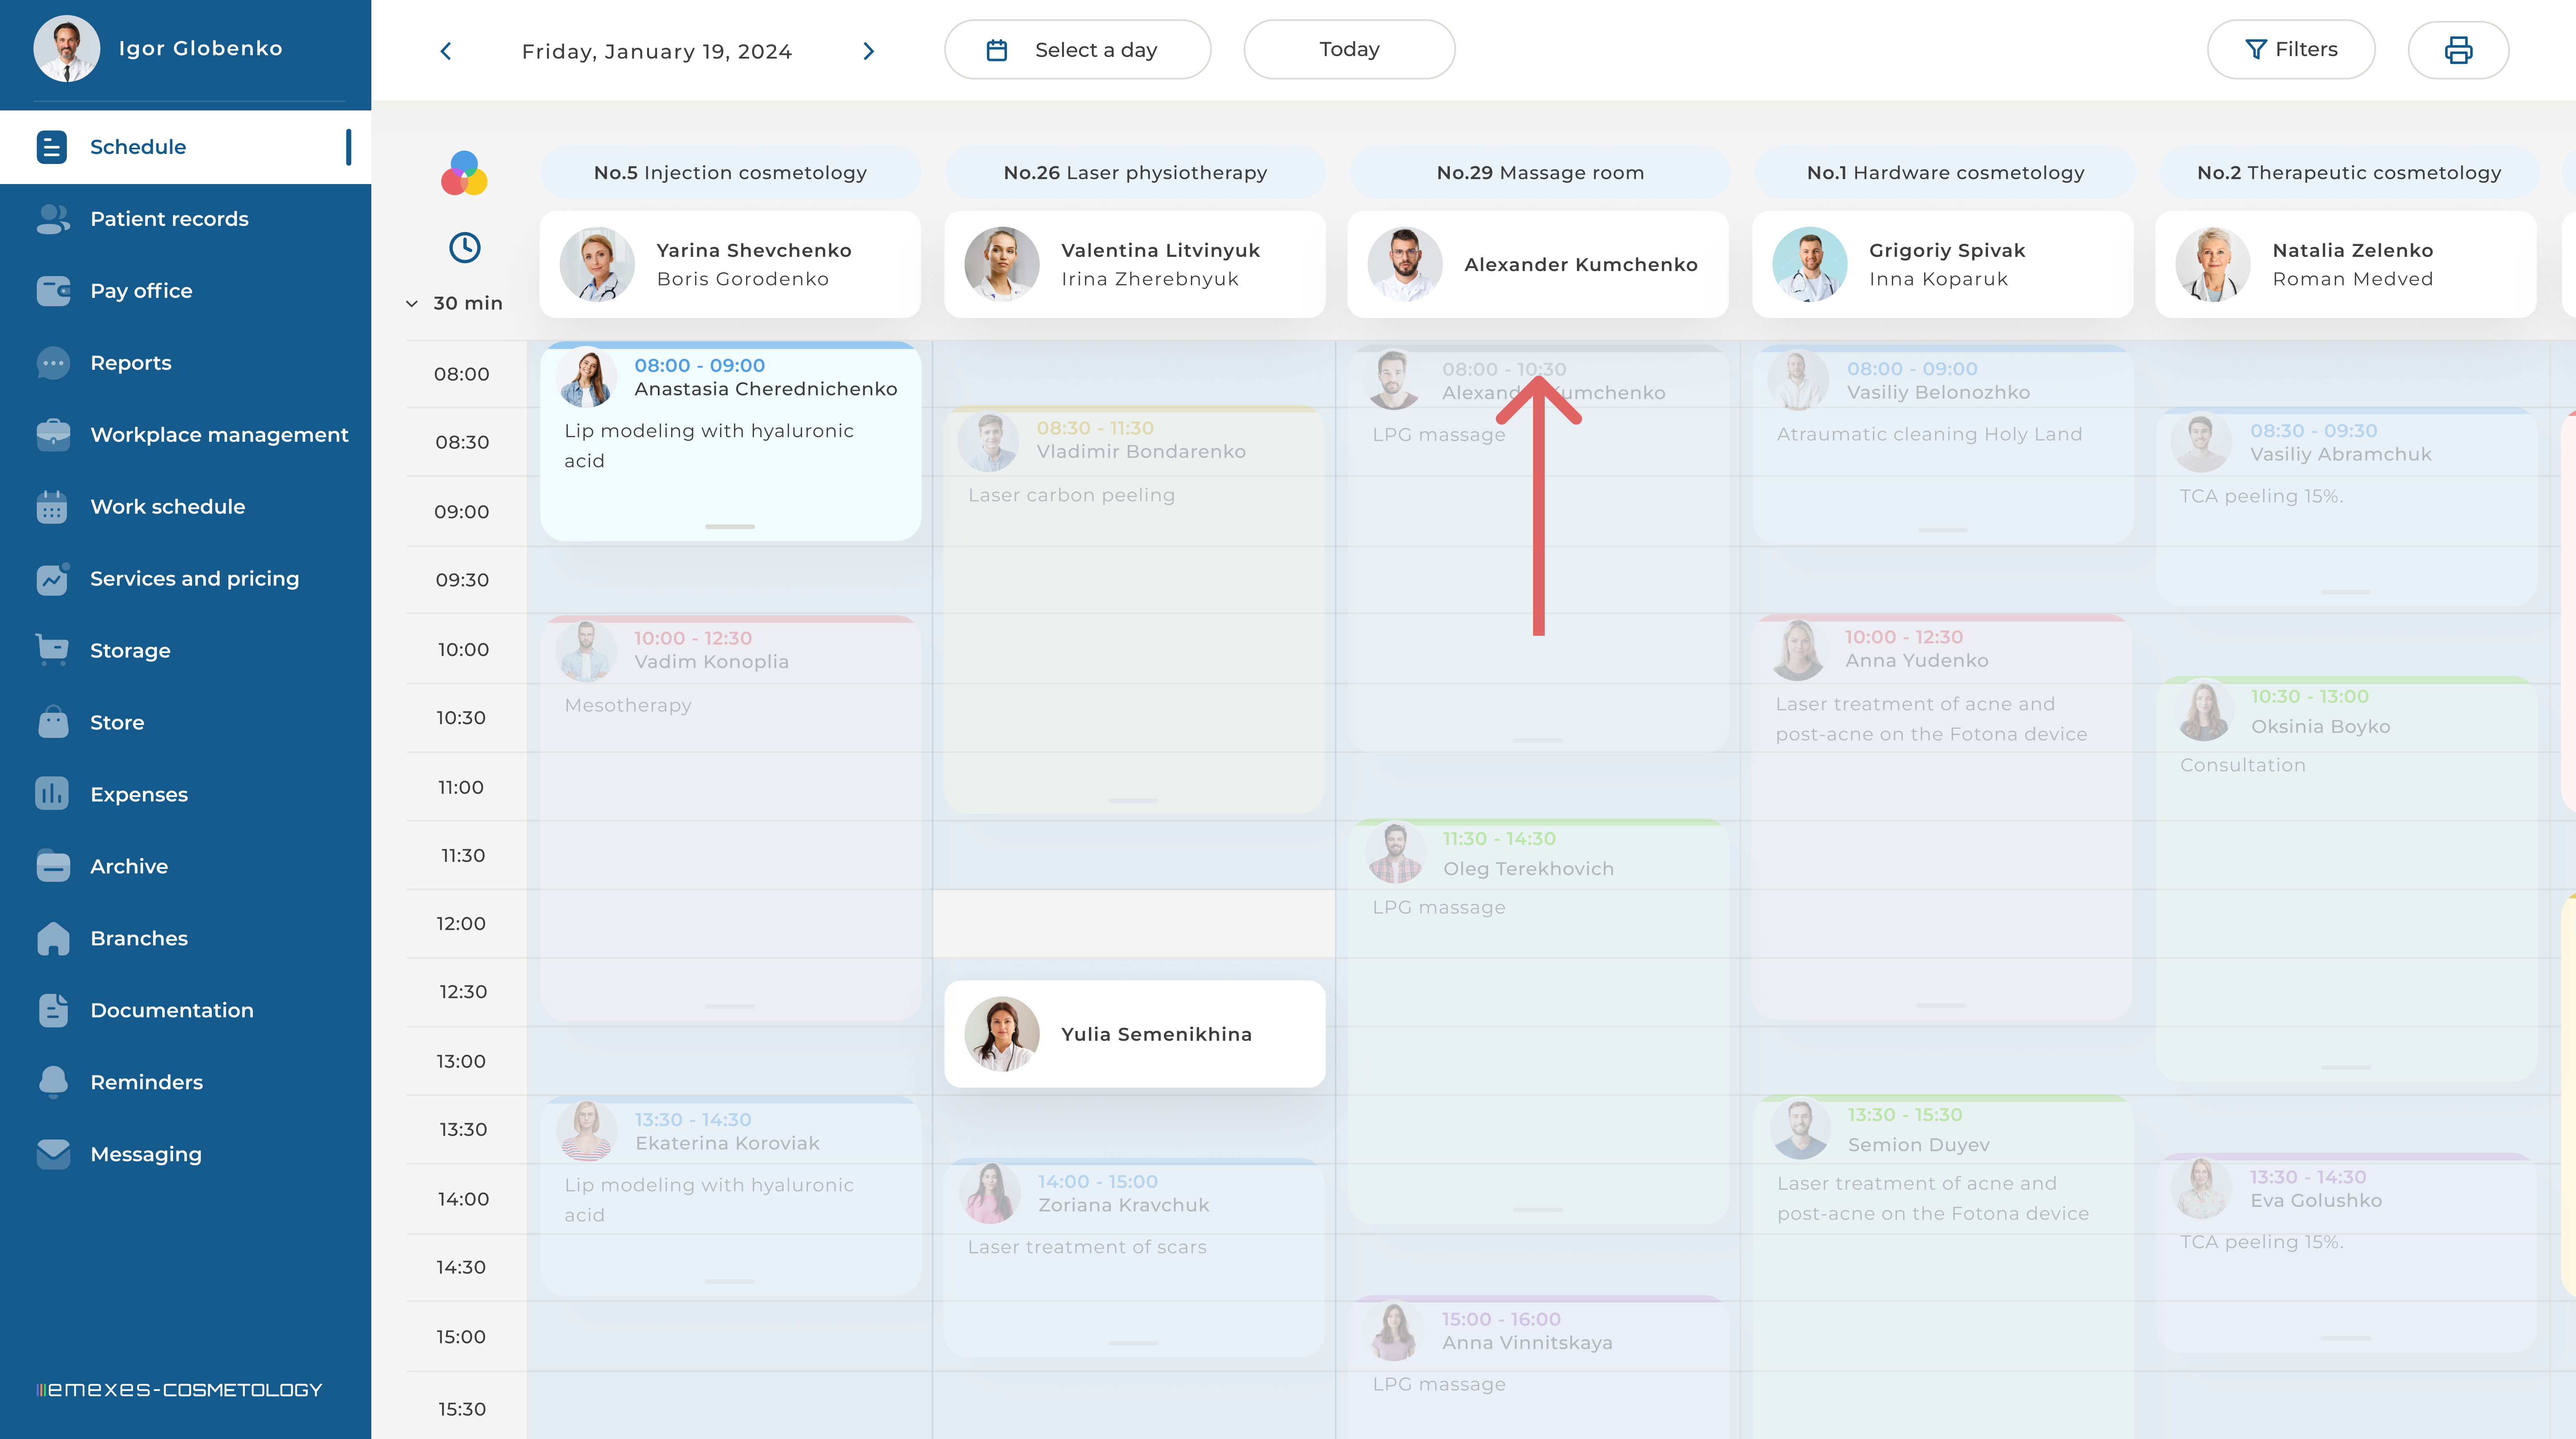
All offices are displayed at the top of the schedule, horizontally. You can rearrange the order of offices, scheduled shifts, and appointments by dragging them to the desired location. Each employee can customize the order in which the offices are displayed individually.
By clicking on an office, you can view its schedule for the selected day.
3. DOCTOR AND MEDICAL ASSISTANT SHIFTS
For employees with a consistent work schedule and an assigned office, shifts in the schedule are created automatically based on the data specified in their profile. The administrator can edit existing shifts, remove irrelevant ones, and create new shifts as needed.
Several specialists can work on the same shift and in the same office, if their work schedules overlap. Thus, you can assign an assistant to a doctor, indicating the same office in the schedule as the doctor's.
Multiple specialists can work during the same shift and in the same office if their work schedules overlap. This allows an assistant to be assigned to a doctor, with both specialists scheduled in the same office.
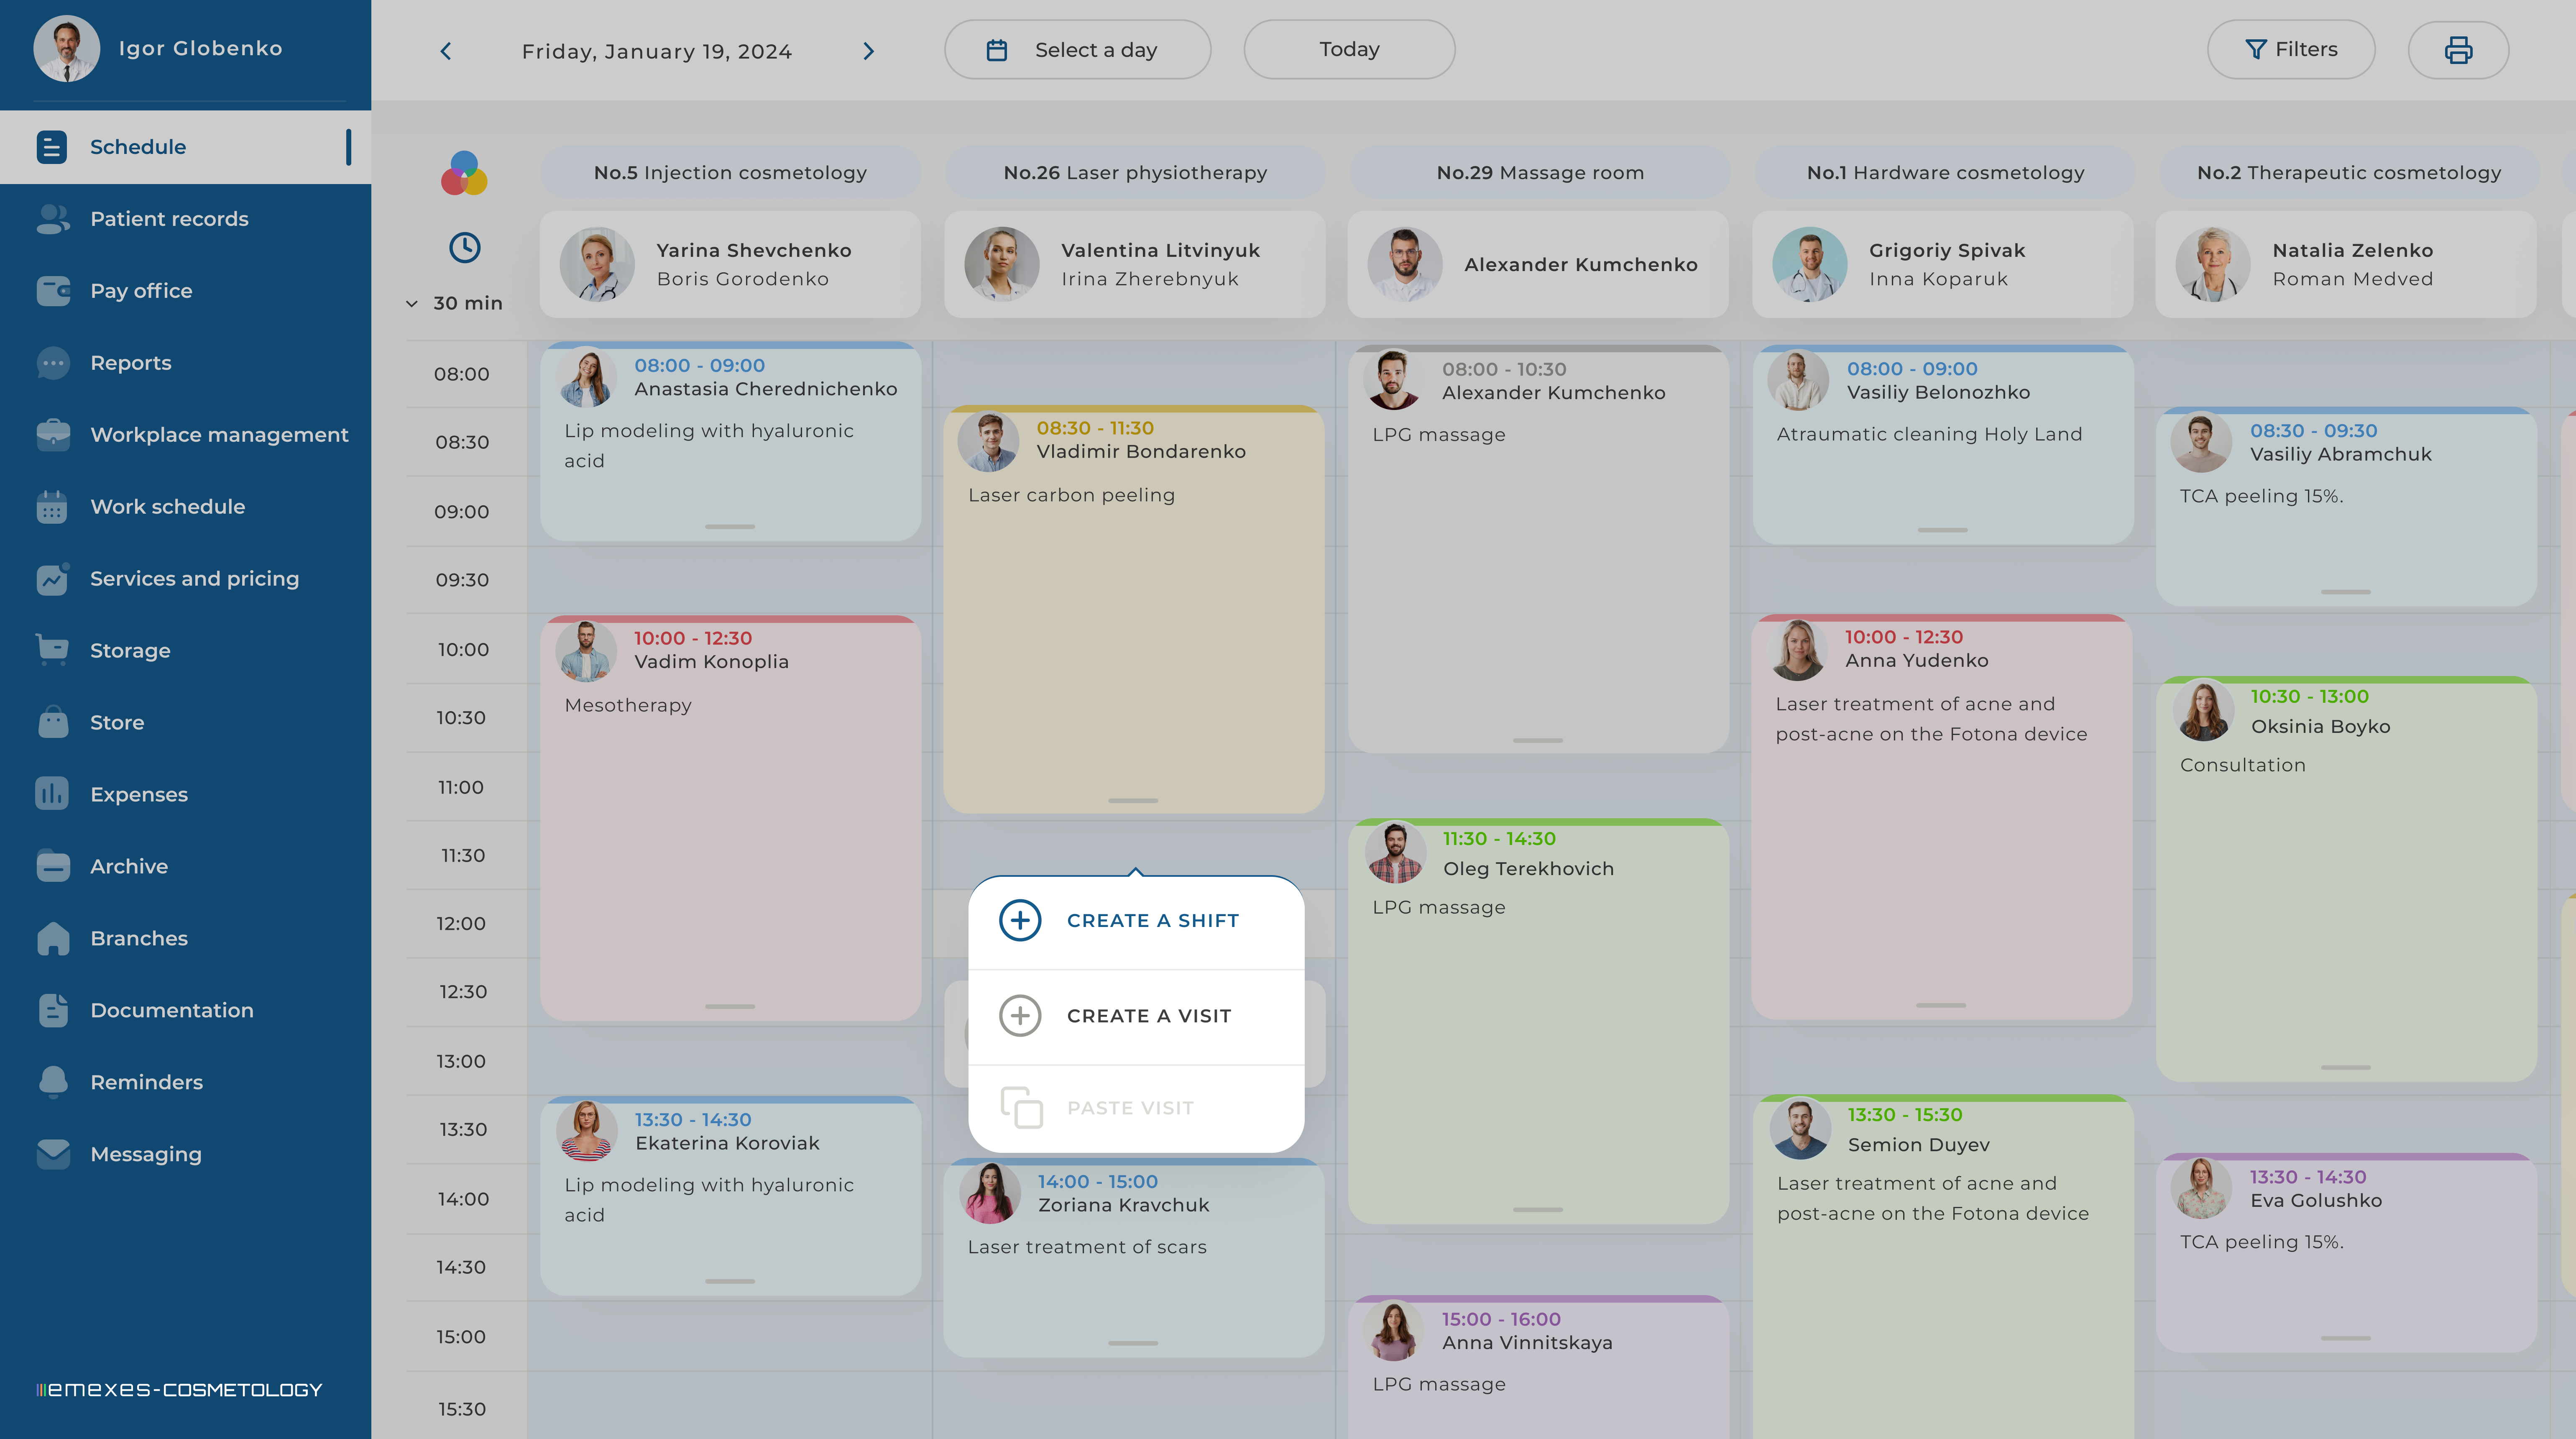
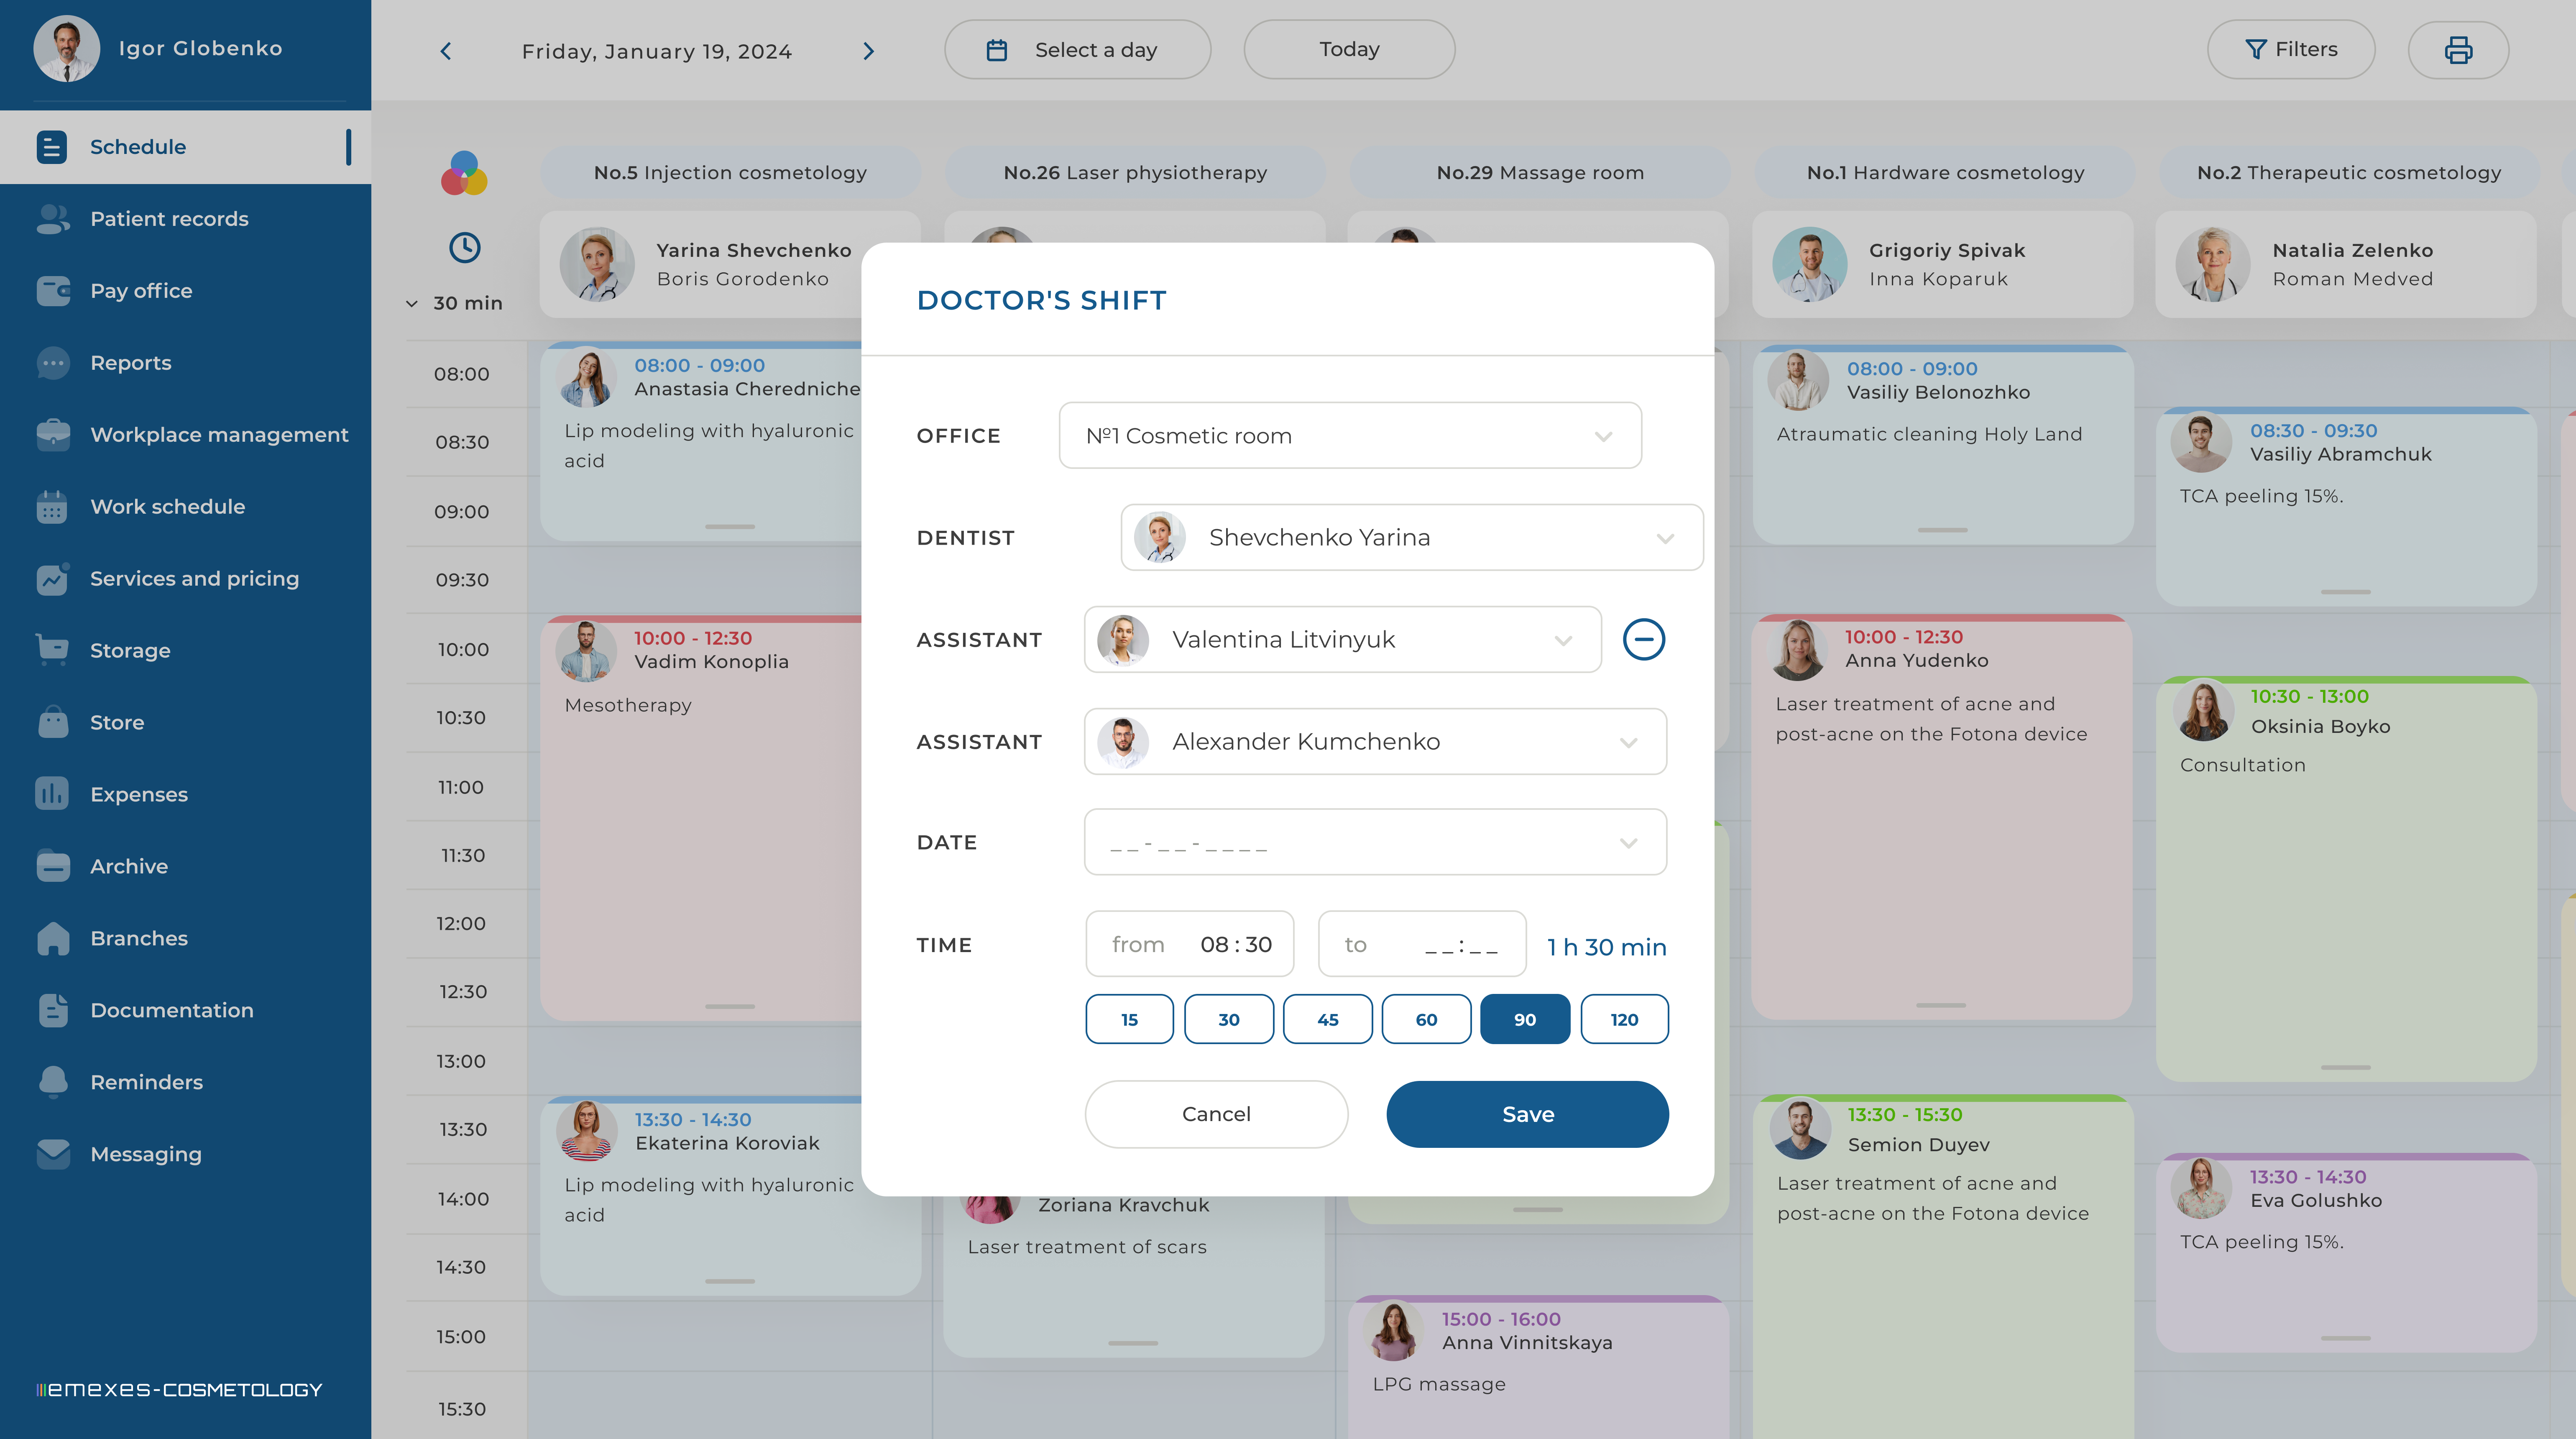
CREATING SHIFTS MANUALLY is an essential feature for quickly adjusting the schedule. To do this, right-click on an available space in the office schedule and select "Create shift". A modal window will appear, where you need to specify:
- The DOCTOR who will be seeing patients in this office.
- The ASSISTANT or multiple assistants if the doctor requires them. If a doctor is designated as an assistant, this role must first be assigned to them in the Workplace Management section.
- The TIME when the shift starts and ends.
- The OFFICE number and DATE, which are automatically generated.
A shift can be created at any time, but it cannot be scheduled before the clinic opens or on a weekend. If you need to create a shift on a default day off, you must first change its status to a working day and set the work hours in the Schedule tab.
To successfully create a new shift, its work hours must not overlap with the work hours of existing shifts, and the specialists specified for the shift must not be assigned to other shifts during this timeframe. Additionally, if there is a scheduled appointment, the shift must start either at the same time as the appointment or after the appointment has concluded. The appointment must either belong entirely to the shift or not be part of it at all.
A shift can be created for a time after the end of an employee’s regular work schedule, and these changes will be reflected in their statistics.
Manually created shifts are treated as one-time exceptions and will not be automatically generated on subsequent days at the same time.
If you decide to create a staff schedule for one of the offices where you’ve manually created shifts for several days in advance, the office will be included in the doctor’s schedule, but all manually created shifts in that office will be removed, and a new staff schedule will be generated. Please note that default shifts have priority over manually created shifts. Any changes made to the default schedule of a doctor working in an office will delete all manually created shifts in that office and rebuild the schedule accordingly.
Editing an existing shift is also available to the clinic administrator. To do this, right-click on the shift and select "Edit shift". A modal window will appear, similar to the one used for creating a shift, which will allow you to change the specialists and adjust the time of the shift.
In order to successfully edit a shift, the same conditions must be met as when creating a shift.
If, during the workday, you need to move an employee from office A to office B, you must first reduce the existing employee shift in office A by editing it. Then, create a new shift in office B.
In this case, you will also need to move any scheduled appointments from office A to office B by either dragging and dropping them or using the context menu.
Editing a shift is considered a one-time action and is treated as an exception. Therefore, if a doctor's shift is created automatically and later edited on a specific day, it will be recreated the next day according to the staff schedule.
Removing an existing shift is a feature included in the clinic system. If a shift is removed, no doctor(s) will be assigned to the appointments that were originally scheduled during the deleted shift, unless those appointments are rescheduled to fit within a new shift’s timeframe.
Removed shifts cannot be restored. They can only be restored manually by creating new shifts.
This action is a one-time exception and does not affect the automatic creation of shifts on subsequent days.
4. PATIENT APPOINTMENTS
Patient appointments are created manually by the clinic administration. Each appointment is scheduled for a specific time and assigned to a particular office.
Appointment Statuses
An appointment can be assigned one of the following seven statuses:
- Scheduled (highlighted blue) – The patient has an appointment that has not yet been completed.
- Done (highlighted green) – The patient’s appointment has been completed.
- Missed (highlighted red) – The patient did not show up for their appointment without notifying the clinic.
- Rescheduled (highlighted yellow) – The patient rescheduled their appointment for another day.
- Canceled (highlighted gray) – The patient canceled their appointment with prior notice.
- No Contact (highlighted purple) – The patient did not answer the call from the administration to confirm the appointment.
- Confirmed (highlighted light green) – The patient confirmed their scheduled appointment after the administration's call.
By clicking the palette icon in the upper left corner of the screen, you can view hints about the appointment status colors.
Creating an Appointment
Creating appointments is the responsibility of the clinic manager, who receives calls from patients. To create an appointment, follow these steps:
- Right-click on a free space in the specific office schedule.
- Select "Create an appointment" from the context menu.
- In the modal window that appears, specify the following details:
- Patient: Select an existing patient from the list or click the "+" icon to create a new patient.
- Time: Set the appointment start and end time, depending on the complexity of the procedures.
- Commentary: Add any relevant notes for the specialist or administration.
- Date & Office: These are automatically populated based on the selected office and date in the schedule (they cannot be edited).
Appointment Creation Process:
- When creating an appointment, it should ideally be placed in the correct office and at the correct time to minimize the need for further editing.
- Appointments can be created either within an existing shift or at a time when the shift has not yet been created. If the appointment is created within an existing shift, the specialists assigned to that shift will automatically appear in the appointment creation window.
Key Requirements for Successful Appointment Creation:
- No Overlap: The created appointment must not overlap with an existing appointment.
- Shift Conflict: An appointment cannot belong to two shifts simultaneously.
- Shift Boundaries: The appointment cannot start within a shift and end outside of it (or vice versa).
- Timing: The appointment cannot be scheduled earlier than the clinic’s work hours or on a weekend. If the appointment is to be scheduled on a default day off, first change the status of that day to a workday and set the work hours in the Schedule tab.
If all the conditions are met, after clicking "Save", the newly created appointment will appear in the schedule with the "Scheduled" status.
Viewing a Created Appointment is available by left-clicking on the appointment.
When viewing an appointment, you will see the following information:
- The full name and phone number of the patient with the appointment. Click on the patient's last name or profile picture to view the patient's details.
- The current Appointment Status, which can be quickly changed by selecting another status from the list.
- The Appointment Date and Time.
- Commentary, if provided.
- The Office where the patient is scheduled to be seen.
- The Employees working in this office at the time of the patient's appointment.
- The button for Appointment or Treatment Plan for this patient.
- Quick links to sections of the patient record.
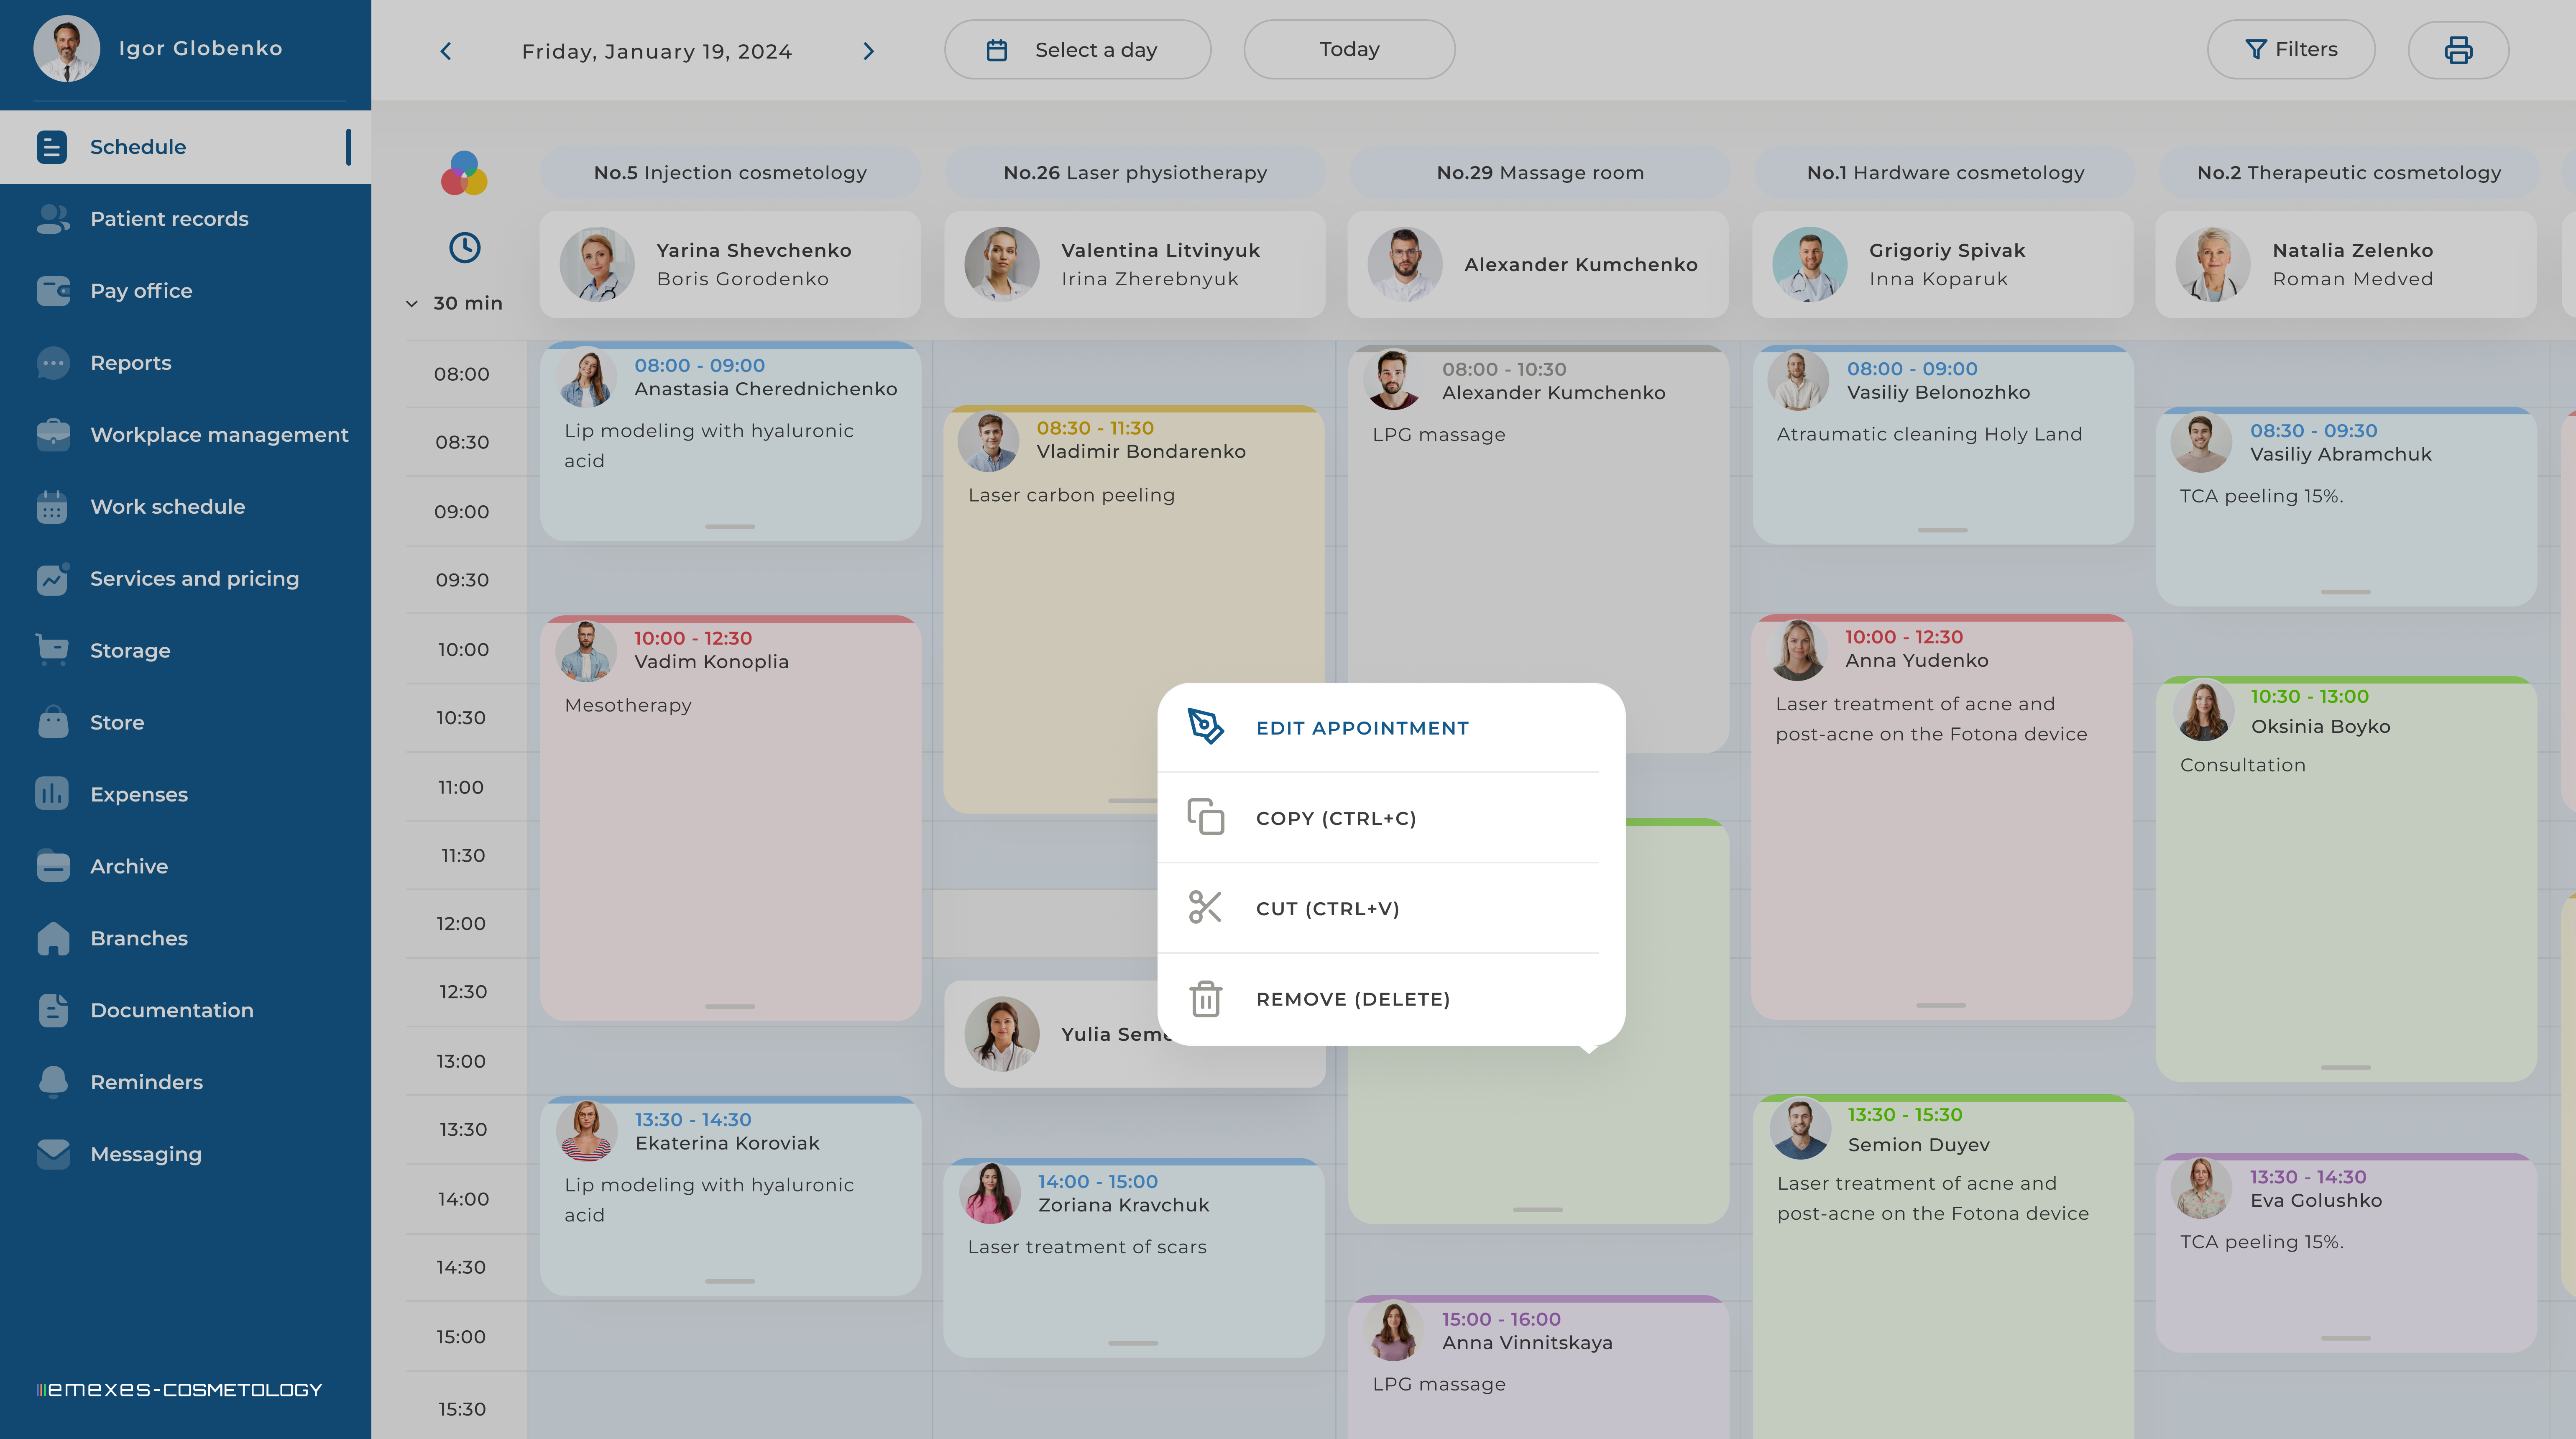
Editing an Existing Appointment allows the administrator to change the status of an appointment and make changes to the data entered during its creation (note that the office number and date are not editable). To do this, the administrator should right-click on the appointment and select "Edit Appointment."
A convenient way to adjust the length of an appointment is by stretching or shrinking the appointment window vertically. To do this, drag the gray bar at the bottom of the appointment window.
Rescheduling Your Appointment to Another Date or Office is a feature that clinic administration may need when they want to change the time, date, or office of an appointment. This action can be performed in two convenient ways:
- Drag and Drop: This method is the fastest and most convenient when moving the appointment within the current day. To do this, left-click and drag the appointment to the desired position in the schedule.
- Cut and Paste: This method is useful when moving an appointment to another date. To do this, right-click on the appointment to open the context menu and select "Cut." After that, you can paste it into the desired day, time, and office. The transfer of the appointment must comply with the conditions for creating a new appointment.
To activate the cut-and-paste feature, some users may need to right-click on the settings icon in the address bar and activate the clipboard in the modal window.
The "Appointment Copying" feature also allows the administrator to quickly create standard appointments for a patient requiring long-term, step-by-step treatment. By selecting the "Copy Appointment" option in the context menu, the administrator can paste copies of the appointment into new dates, editing the necessary data if needed. All copied appointments are automatically created with the "Scheduled" status.

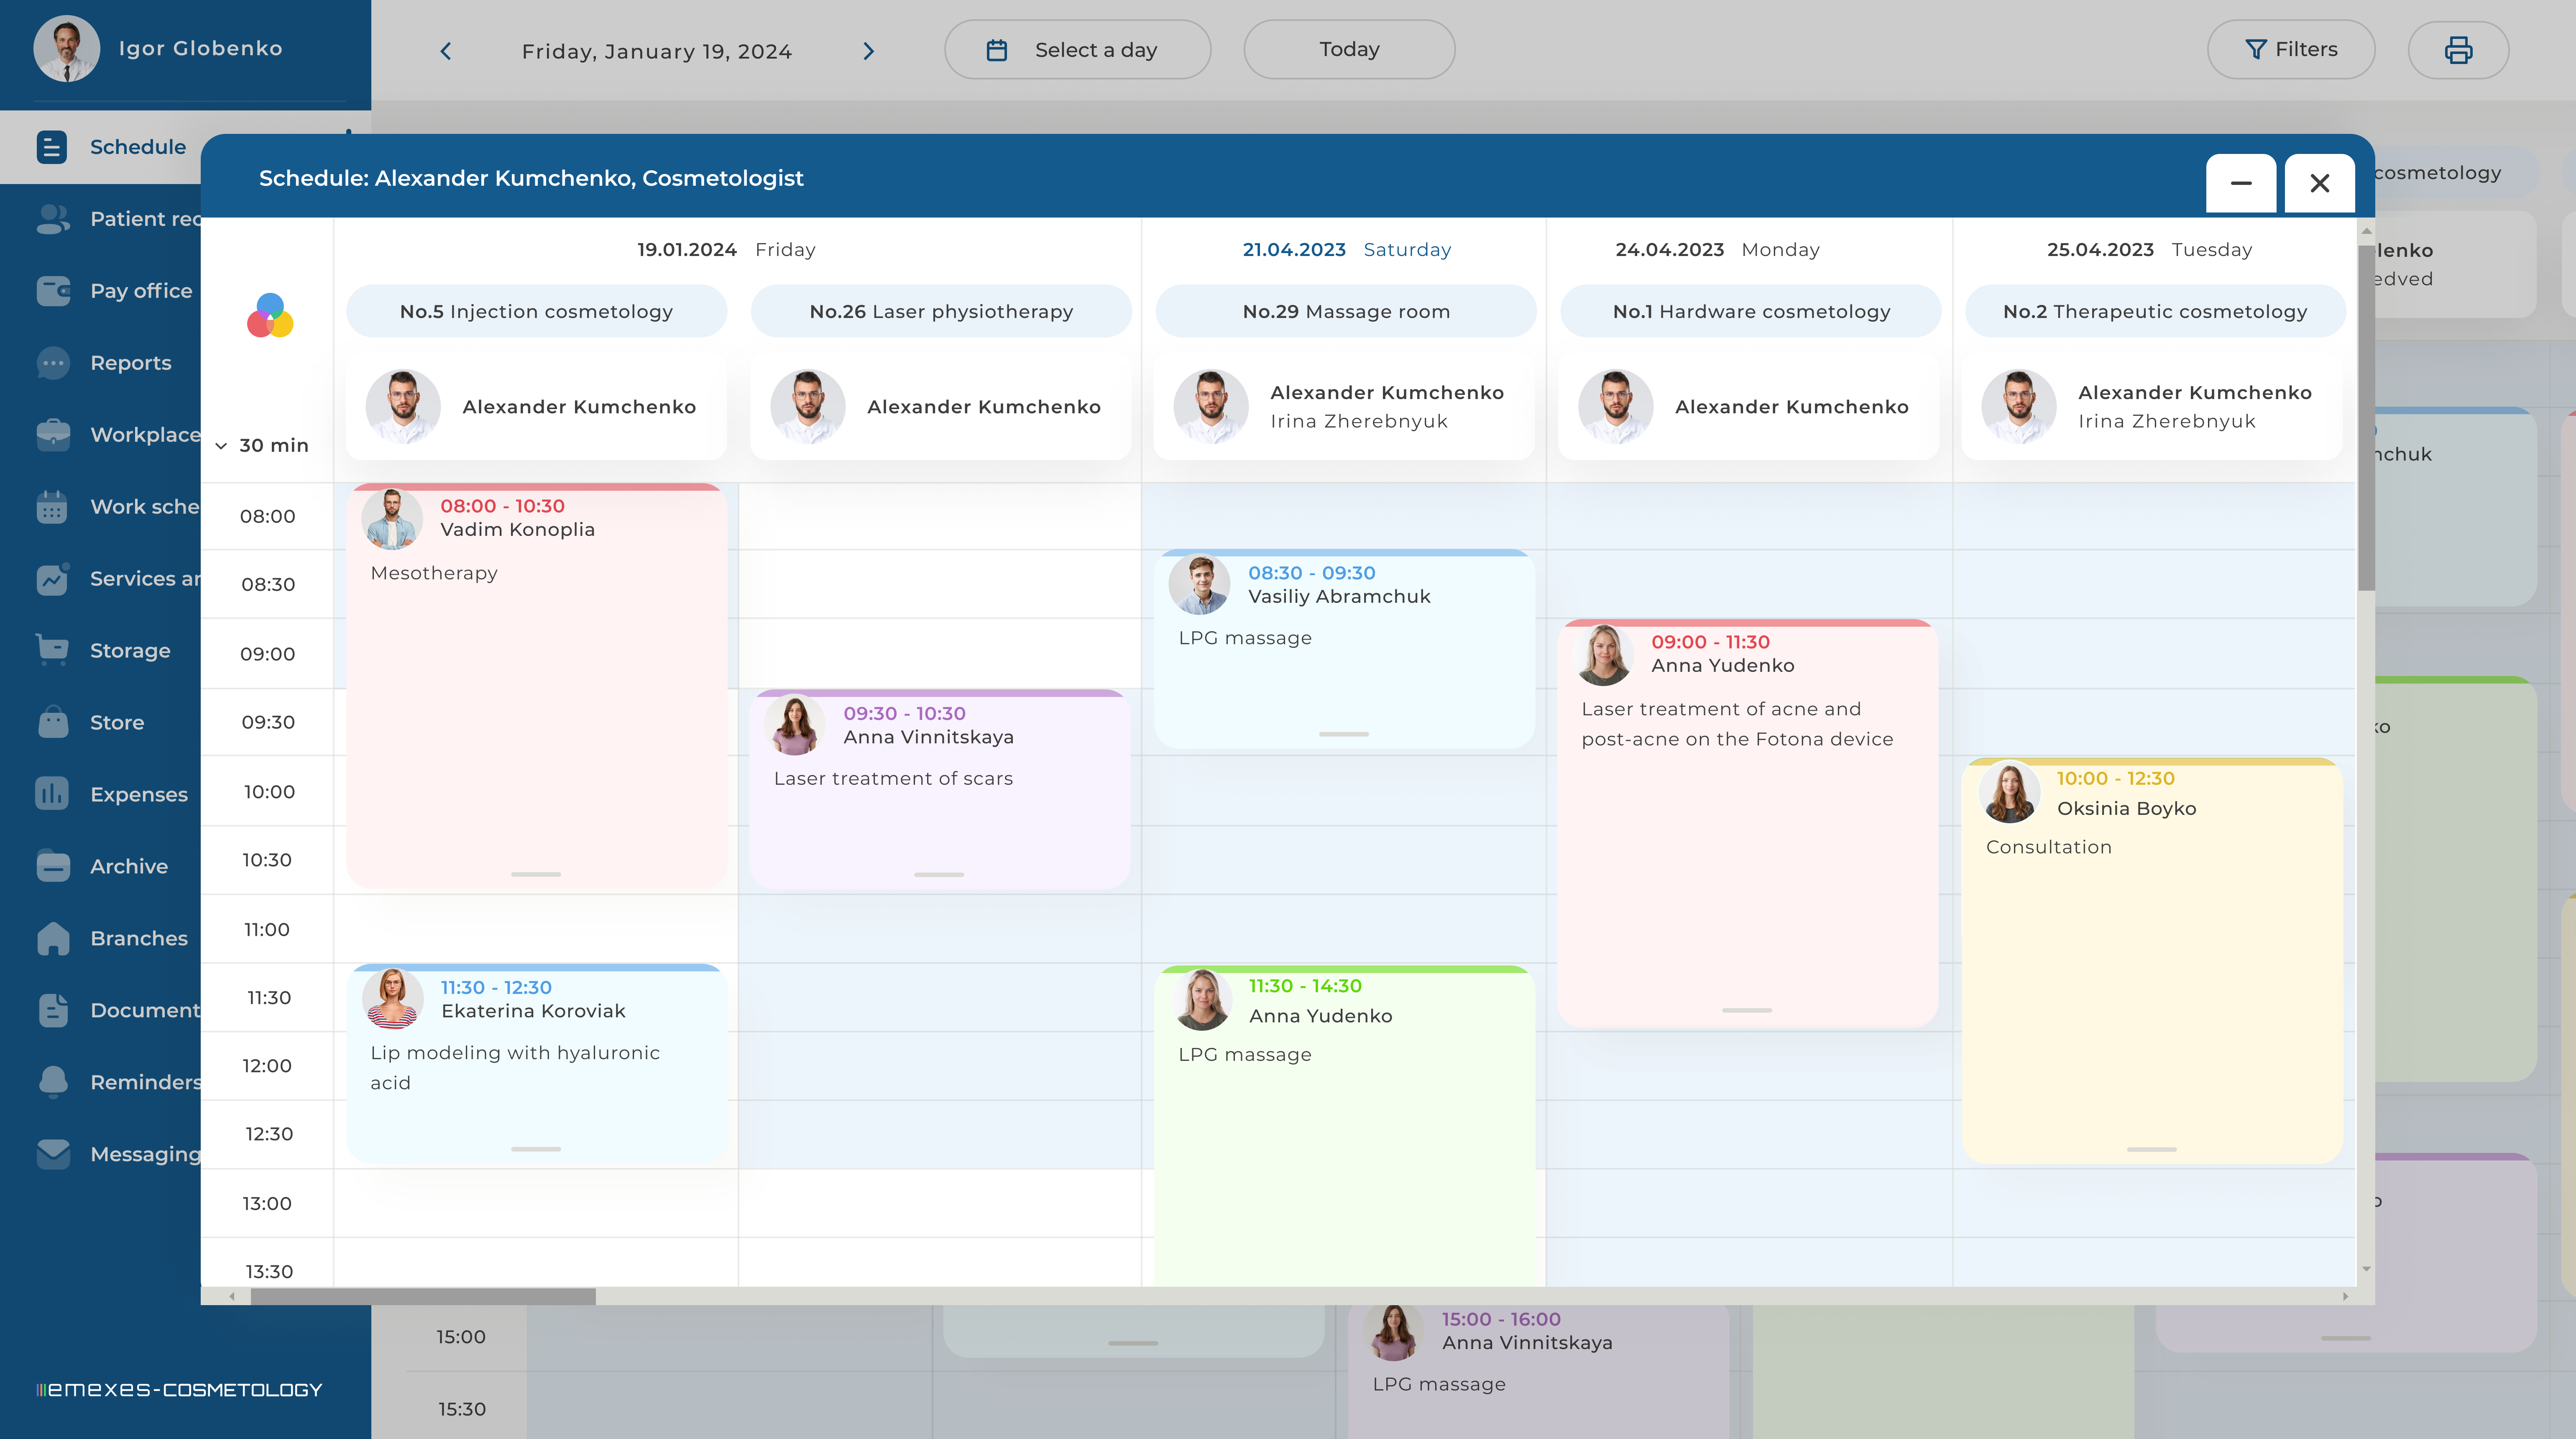
5. INDIVIDUAL STAFF MEMBER'S SCHEDULE
The system provides the option to view each employee's schedule individually. To do this, left-click on the shift and click the "View Schedule" button under the employee's name.
A pop-up window will then open, displaying this employee's schedule for today and the following days of the month, showing their working hours and patient appointments. In this window, you can schedule new appointments for the doctor and edit existing ones. All actions will be automatically reflected in the main clinic schedule. However, you cannot edit or create shifts while viewing the doctor's schedule.
You can also view the doctor's schedule in the Workplace Management / Employee List tab. The schedule is available only for employees who have been assigned an office and whose work schedule has been approved.